Device Setup
Use the guides below to add your email account to your device(s).
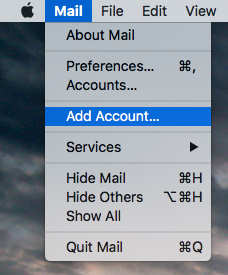
- In the menu bar at the top of the screen, select Mail, Add account
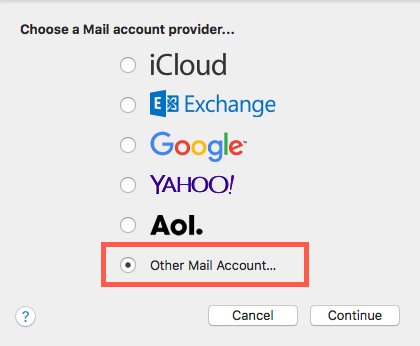
- Click the radio button next to Other Mail Account, then select Continue
- In the next panel, Add a Mail account, enter your Name, Email Address and email account Password
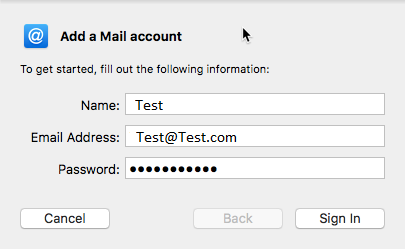
- Click Sign In
Note
Apple Mail will attempt to automatically retrieve your email server details If your server details are not automatically retrieved, you should enter them manually in the next panel
| Setting | Value |
|---|---|
| Email Address | Your full email address |
| User Name | Your full email address |
| Password | Your email account password |
| Account Type | IMAP |
| Incoming Mail Server | mail.tibus.net |
| Outgoing Mail Server | mail.tibus.net |
- Once the details have been entered, click "Sign In"
Advanced settings
If you are asked to confirm the port configuration, use the following details:
| Setting | Value |
|---|---|
| Incoming Port | 993 |
| Outgoing Port | 465 |
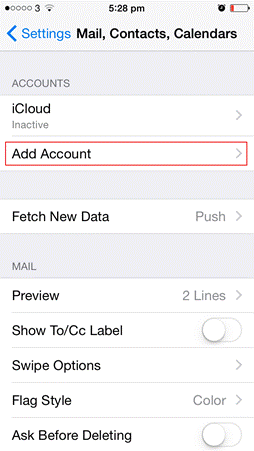
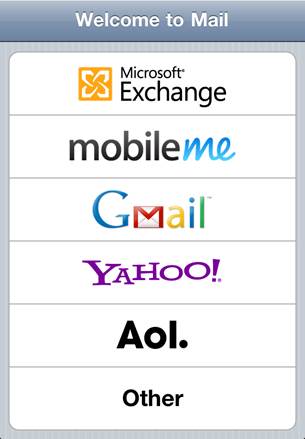
- Go to Settings, Passwords & Accounts, then tap Add Account
- Chose Other from the list
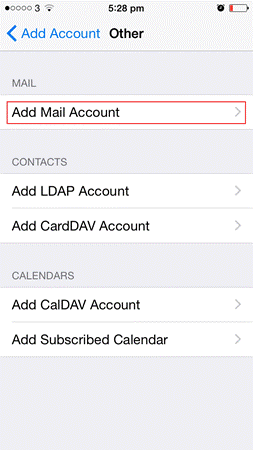
- Then tap Add Mail Account
-
Enter your Name, Email, Password, and a Description
-
Tap Next
Note
Mail will try to find the email settings and finish your account setup
- Click on Done
- Open your mail app (instructions may vary) then Settings, Add Account
- Enter your email address next to the username, followed by the password
- Select IMAP
- Type your email address next to the username
- Enter your password
- Enter settings
| Setting | Value | Security Type |
|---|---|---|
| Incoming Mail Server | mail.tibus.net |
|
| Outgoing Mail Server | mail.tibus.net |
|
| Incoming Port | 993 |
SSL |
| Outgoing Port | 587 |
SSL |
- Once the details have been entered, click Sign In
- Check the box next to Require Sign-In.
- Type your email address next to the username and the password
- Click Next to complete
This guide will help you configure your Outlook email client to use IMAP with Tibus mail services. Follow the steps below to get started:
Step 1: Open Outlook Account Settings
- Open Microsoft Outlook.
- Click on File in the top left corner.
- Click Add Account or go to Account Settings > Manage Profiles.
- Click Add New Account.
Step 2: Enter Your Email Address
- Enter your full email address and click Connect.
Step 3: Choose Account Type
- Select IMAP as the account type.
Step 4: Enter Server Settings
- Incoming Mail Server (IMAP):
- Server:
mail.tibus.net - Port:
993for secure (recommended) or143for insecure - Encryption Method: SSL/TLS (for secure) or None (for insecure)
- Outgoing Mail Server (SMTP):
- Server:
mail.tibus.net - Port:
587for secure (recommended) or25for insecure - Encryption Method: STARTTLS (for secure) or None (for insecure)
Step 5: Enter Your Username and Password
- Username: Your full email address (e.g.,
[email protected]) - Password: Your email account password
Step 6: Complete Setup
- Click Next.
- Outlook will test your settings; if everything is correct, you'll see a success message.
- Click Finish to complete the setup.
Notes
- We recommend using secure ports (993 for IMAP, 587 for SMTP) for better security.
- If you encounter any issues, double-check your server names, ports, and encryption settings.
That's it! Your Outlook client should now be ready to send and receive emails using Tibus IMAP settings.
This guide will help you configure your Samsung Mail app to use IMAP with Tibus mail services. Follow the steps below to get started:
Step 1: Navigate to Settings
Step 2: Tap Accounts and backup
Step 3: Tap Manage accounts
Step 4: Tap + Add account
Step 5: Tap Email
Step 6: Choose Other
Step 7: Choose IMAP
Step 8: Enter Server Settings
-
Incoming Mail Server (IMAP):
-
Server:
mail.tibus.net - Port:
993for secure (recommended) or143for insecure -
Encryption Method:
SSL/TLS(for secure) or None (for insecure) -
Outgoing Mail Server (SMTP):
-
Server:
mail.tibus.net - Port:
587for secure (recommended) or25for insecure - Encryption Method:
SSL/TLS(for secure) or None (for insecure)
Step 9: Enter Your Username and Password
- Username: Your full email address (e.g., [email protected])
- Password: Your email account password
Step 10: Complete Setup
- Click Next.
- The device will test your settings; if everything is correct, you'll see a success message.
- Click Finish to complete the setup.
Notes:
- We recommend using secure ports (
993forIMAP,587forSMTP) for better security. - If you encounter any issues, double-check your server names, ports, and encryption settings.
This guide will help you configure your Windows 10/11 Mail app to use IMAP with Tibus mail services. Follow the steps below to get started:
Step 1: Open Windows Live Mail
- Add your email accounts dialog will appear automatically.
- If it does not, click the File button in the top left of the window, then go to Options → Email accounts… to open the Accounts window. Click the Add… button.
Step 2: Fill in Your Name and Email Address
- Email Address: Enter the email address you wish to use for sending mail (e.g.,
[email protected]). - Password: Enter your Windows Live app password.
- Display name for your sent messages: Enter the name people will see on the email you send.
Step 3: Configure Incoming Mail Server Information
- Server:
mail.tibus.net - Logon user name: Your full Tibus Mail username, including the domain.
- Port:
993for secure (recommended) or143for insecure. - Require a secure connection (SSL) (recommended) : Yes (or leave unticked for None).
- Authenticate using: Clear text.
Step 4: Configure Outgoing Mail Server (SMTP)
- Server:
mail.tibus.net - Port:
587for secure (recommended) or25for insecure. - Require a secure connection (SSL) (recommended) : Yes (or leave unticked for None).
Step 5: Click Next and Enter Your Credentials
- Username: Enter your full email address (e.g.,
[email protected]). - Password: Enter your email account password.
Step 6: Complete Setup
- Click Next. Windows Live Mail will test your settings. If everything is correct, you'll see a success message.
- Click Finish to complete the setup.
Notes:
- We recommend using secure ports (993 for IMAP, 587 for SMTP) for better security.
- If you encounter any issues, double-check your server names, ports, and encryption settings.